
Recipes · 9 min read
How to Cook Pizza on the Big Green Egg: From Setup to First Slice
The Big Green Egg isn't just a smoker – it's one of the best pizza ovens money can buy. With a pizza stone and the right setup, you can hit 700°F and cook a Neapolitan-style pie in under three minutes. Here's everything you need to know.
01
Your Big Green Egg Is a Pizza Oven
Most Big Green Egg owners buy it for one reason – smoking, grilling, or some combination of both. But the Egg has a capability that surprises many owners: it's one of the best pizza ovens available for residential use, outperforming most purpose-built pizza ovens costing thousands of dollars.
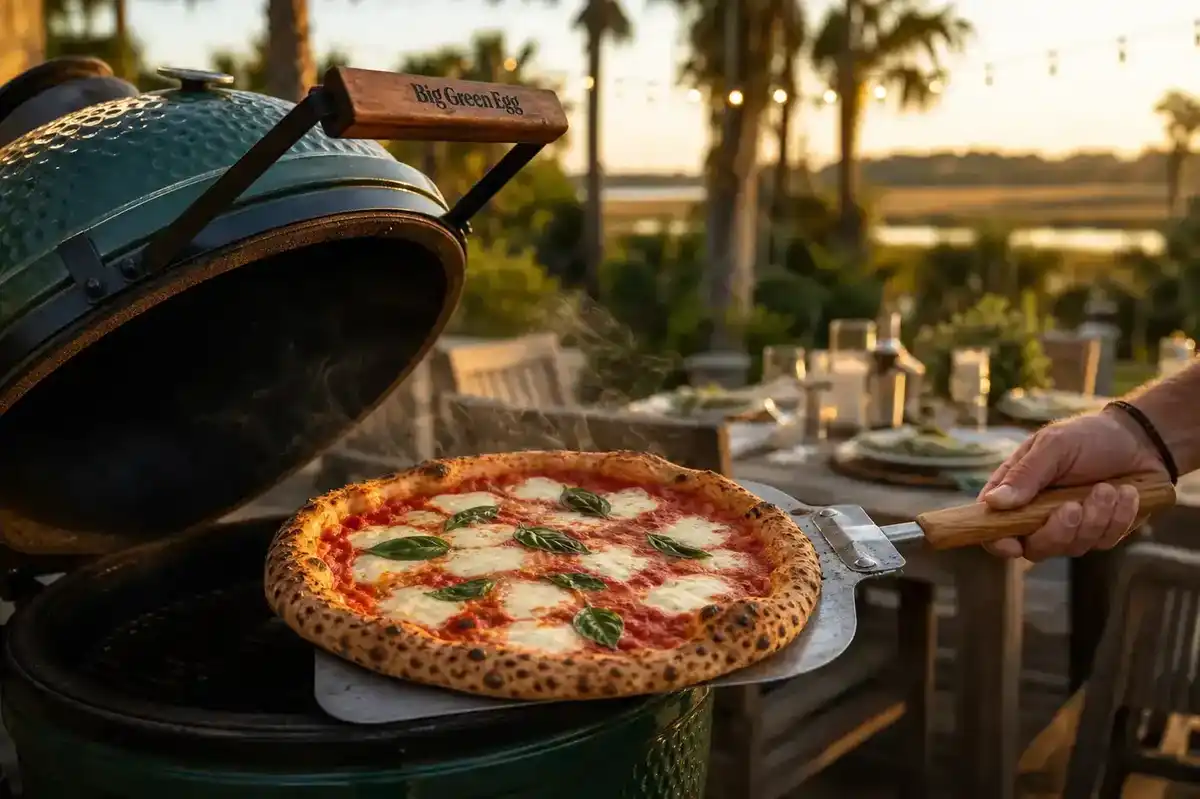
The reason is physics. The Egg's thick ceramic walls absorb and radiate heat evenly from all directions – top, sides, and bottom. When you push it to 600–700°F with a pizza stone inside, you get something very close to the dome oven environment of a Neapolitan pizzeria. The stone provides intense bottom heat for a crisp, charred crust. The radiant dome heat cooks the toppings and blisters the cornicione – that puffy, leopard-spotted outer rim that marks a properly fired pizza.
A conventional oven maxes out at 500–550°F and heats almost exclusively from below. That's why home oven pizza – no matter how good the dough – never quite achieves the blistered, slightly smoky character of a wood-fired pie. The Big Green Egg eliminates that gap entirely.
02
What You Need: The Essential Setup
The beauty of Egg pizza is its simplicity. You need exactly three things beyond the Egg itself:
A ConvEGGtor (plate setter). This ceramic heat deflector creates indirect heat by blocking the direct flames from reaching the pizza stone. It sits between the fire and the stone, forcing hot air to circulate around and over the pizza like a convection oven. This is the piece that turns a grill into a pizza oven.
A pizza stone. A thick ceramic or cordierite pizza stone sits above the ConvEGGtor and provides the intense bottom heat that creates a crisp, charred crust. Big Green Egg makes stones sized specifically for the Egg, but any quality pizza stone that fits the diameter will work. The stone should be at least half an inch thick – thicker stones hold more heat and produce better results.
A pizza peel. You need a way to launch the pizza onto the hot stone and retrieve it. A wooden peel works best for launching (dough slides off wood more easily than metal), and a metal turning peel is helpful for rotating the pizza during the cook.
That's the essential kit. A few optional additions that make the process smoother: an infrared thermometer for reading the stone temperature accurately, a bench scraper for portioning dough, and a pizza cutter – though honestly, a sharp chef's knife works just as well.
03
Building the Fire: Getting to 700°F
Fill the firebox with natural lump charcoal – not briquettes. Lump charcoal burns hotter, cleaner, and with less ash than briquettes, and it's what the Egg was designed for. For pizza, you want a full firebox. You're running the Egg at its highest temperatures, and you need a large, hot coal bed to sustain that heat through multiple pizzas.
Light the charcoal with a natural fire starter or an electric starter. Leave the bottom vent fully open and the lid cracked for 10–12 minutes while the fire establishes. You'll see flames and hear the fire roaring – this is correct. You want aggressive heat.
Once the fire is established, install the ConvEGGtor legs-up, place the cooking grate on top, and set your pizza stone on the grate. Close the lid with the top vent (daisy wheel) wide open.
Now wait. This is the step most people rush, and rushing it is the single most common mistake in Egg pizza. The stone needs 30–45 minutes to fully absorb heat, even after the Egg's dome thermometer reads 600°F. A dome temp of 650–700°F with a stone temp of 650°F or higher is what you're after.
If you have an infrared thermometer, use it to read the stone surface directly. This is far more accurate than the dome thermometer for pizza purposes. If you don't have one, wait a full 45 minutes after the dome hits 600°F. The extra patience pays for itself in crust quality.
04
The Dough: Simple, Patient, Worth It
Great pizza dough requires four ingredients: flour, water, salt, and yeast. Nothing else. The magic is in the ratios and the time.
For Neapolitan-style pizza on the Egg, use a high-protein bread flour – King Arthur Bread Flour or Caputo Tipo 00 are both excellent choices. Tipo 00 produces a slightly more tender, charrable crust. Bread flour gives a chewier, sturdier result. Both work beautifully.
Here's a recipe for four 12-inch pizzas:
500g flour (bread flour or Tipo 00)
325g water (65% hydration – lukewarm, about 75°F)
10g fine sea salt (2% of flour weight)
3g active dry yeast (about 1 teaspoon)
Dissolve the yeast in the warm water and let it sit for 5 minutes until slightly foamy. Add the salt to the flour and mix. Pour in the water-yeast mixture and stir until a shaggy dough forms. Turn it out onto a clean counter and knead for 8–10 minutes until smooth and elastic. The dough should be slightly tacky but not sticky – if it's sticking to your hands, add a light dusting of flour.
Form the dough into a ball, place it in a lightly oiled bowl, cover with plastic wrap, and refrigerate for 24 hours. This cold fermentation develops flavor complexity that a quick rise can't match – the dough will taste slightly tangy and nutty, with a depth that comes only from time.
On pizza day, remove the dough from the refrigerator 2 hours before you plan to cook. Divide it into four equal portions (roughly 210g each) and shape each into a tight ball. Place the balls on a lightly floured sheet tray, cover with a damp towel, and let them come to room temperature. This relaxes the gluten and makes the dough much easier to stretch.
05
Stretching and Topping: Less Is More
Stretching dough is a skill, and the single most important rule is: don't use a rolling pin. A rolling pin compresses the gas bubbles that create the open, airy crumb structure of a great crust. Use your hands.
Flour your work surface generously. Press the dough ball flat with your fingertips, working from the center outward. Leave the outer half-inch untouched – this becomes the cornicione. Once you've pressed it to about 8 inches, pick it up and drape it over your knuckles. Gently rotate and stretch, letting gravity do most of the work. You're aiming for a 12-inch round that's thin in the center and thicker at the rim.
It doesn't need to be perfectly round. Irregular edges are a sign of hand-stretched pizza, not a defect.
Now – and this is critical – keep the toppings minimal. At 700°F, the pizza cooks in 2–3 minutes. Heavy toppings won't have time to cook through, and excess moisture from too many vegetables or too much sauce will make the center soggy.
06
Classic Margherita
This is the definitive test of your Egg as a pizza oven:
A thin, even layer of crushed San Marzano tomatoes (not cooked – straight from the can, crushed by hand and lightly salted)
Fresh mozzarella, torn into roughly 1-inch pieces and patted dry with paper towels
A drizzle of good extra-virgin olive oil
Fresh basil leaves, added after the pizza comes off the stone
That's it. Four toppings. The quality of each matters enormously at this level of simplicity. Use the best San Marzano tomatoes you can find, fresh mozzarella from a good deli – not the pre-shredded bags – and olive oil you'd happily pour over bread.
07
White Pie with Ricotta and Lemon
For a variation that showcases the Egg's dome heat:
A thin base of olive oil (no sauce)
Fresh ricotta, dolloped in spoonfuls
Grated Parmigiano-Reggiano
A few thin slices of garlic
Fresh arugula, added after cooking
Lemon zest and a squeeze of lemon juice, added after cooking
The heat puffs the ricotta and browns the garlic, while the Parmesan creates a crispy, salty lacework on the crust. The arugula and lemon added after cooking bring brightness and contrast that cut through the richness.
08
The Cook: 2–3 Minutes of Focus
Transfer the topped pizza onto your floured wooden peel. Give it a gentle shake to make sure it slides freely – if it sticks, lift the edge and throw a little more flour underneath. A stuck pizza on a 700°F stone is a disaster. Better to check now.
Open the Egg and slide the pizza onto the stone with a quick, decisive forward-and-pull-back motion. The peel goes flat on the stone, and a sharp pull back releases the pizza. Practice this motion once or twice with a dry peel before you go live. Confidence and speed matter.
Close the lid immediately. The dome heat is critical – every second the lid is open, you're losing radiant heat.
After 60–90 seconds, open the lid and rotate the pizza 180 degrees with your metal turning peel. The Egg has slight hot spots – usually near the back, closer to the draft door – and rotation ensures even charring.
After another 60–90 seconds, the pizza is done. Look for these signs: the cornicione is puffed and spotted with dark brown or black leopard spots, the underside is charred and crisp (lift an edge with the peel to check), the cheese is bubbling and just beginning to brown in spots, and the toppings are cooked through.
Pull the pizza with your peel, slide it onto a cutting board, and let it rest for 60–90 seconds before cutting. This brief rest allows the molten cheese to set slightly, preventing it from sliding off when you slice.
09
Hosting a Pizza Night
Here's where the Big Green Egg really shines as a social centerpiece. Set up a toppings station with prepped ingredients and let each guest build their own pizza. You manage the Egg – launching, rotating, and pulling pies every few minutes.
A few hosting tips that make the evening run smoothly:
Pre-portion the dough. Four to six dough balls at room temperature, each covered with a damp towel, ready for guests to stretch.
Prep all toppings in advance. Crushed tomatoes in a bowl with a ladle. Cheese torn or shredded. Vegetables sliced. Meats portioned. Everything in small bowls on a table near the Egg. Use quality prep bowls – this is where Made In Cookware's stainless steel mixing bowls earn their keep, looking sharp on the table while being oven-safe and indestructible.
Keep the fire hot. Between pizzas, close the lid and let the stone recover for 3–4 minutes. If the dome temp drops below 600°F, open the bottom vent wider and let the fire build back.
Plan for 2 pizzas per person. Most guests will eat 4–5 slices, and a 12-inch pizza yields 6–8 slices depending on how you cut it. For a party of eight, prep 16 dough balls. It sounds like a lot, but the pies cook so fast that you can run through them in under an hour.
Serve each pizza immediately. Pizza doesn't wait. As each pie comes off the stone, cut it, serve it, and launch the next one. This creates a natural rhythm to the evening – a few minutes of conversation while the pizza cooks, then a burst of activity when it comes off.
10
Common Mistakes (and How to Avoid Them)
Dough sticking to the peel. The most common disaster. Always flour the peel generously, stretch the dough on a separate floured surface, and transfer it to the peel only after topping. Give the peel a test shake before you approach the Egg.
Stone not hot enough. If the bottom isn't charring, the stone didn't absorb enough heat. Be patient. Give it the full 45 minutes.
Too many toppings. The number one beginner mistake. At these temperatures, less is genuinely more. Three to four toppings maximum. Too much weight or moisture creates a soggy center that the short cook time can't fix.
Opening the lid too often. Every lid opening dumps dome heat. Open twice – once to rotate, once to pull. That's it.
Burning the bottom before the top cooks. If this happens, your stone is too close to the coals. Add the ConvEGGtor legs-up to increase the gap between fire and stone, or raise the stone with a second grate.
11
The Big Green Egg Advantage
Purpose-built pizza ovens work, and some of them work very well. But they do only one thing. The Big Green Egg does pizza at a professional level and then turns around and smokes brisket, grills steaks, roasts chicken, bakes bread, and sears fish. No other cooker in the residential market offers that range.
For the Hilton Head homeowner who wants one outdoor cooking tool that does everything – and does everything at an exceptional level – the Big Green Egg is hard to beat. And once you've tasted pizza off a 700°F stone inside a ceramic dome, you'll never order delivery with quite the same enthusiasm again.
12
See the Big Green Egg in Person
Visit our Hilton Head Island showroom to see the Big Green Egg lineup – from the MiniMax to the 2XL. We'll walk you through the pizza setup, the accessories, and everything you need to start making pizzeria-quality pies in your backyard.
Products Featured in This Article
Ready to Create Your Outdoor Space?
Visit our showroom for personalized guidance on furniture, grills, and everything you need to live beautifully outside.
Schedule a Consultation